Difference between revisions of "Application Development Framework setup on Windows"
From Datonis
m (Tag: Visual edit) |
m (Tag: Visual edit) |
||
| (11 intermediate revisions by the same user not shown) | |||
| Line 14: | Line 14: | ||
Make sure you check the options to Add ruby to your system path during the installation. Refer screenshot below | Make sure you check the options to Add ruby to your system path during the installation. Refer screenshot below | ||
| − | == Install development tools == | + | [[File:Ruby-installation.png]] |
| + | |||
| + | == Install nodejs == | ||
| + | Download and install latest nodejs version for Windows x64 platform from https://nodejs.org/en/download/ | ||
| + | |||
| + | == Install and configure development tools == | ||
| + | * Install MSYS2 for Windows x64 platform from: http://www.msys2.org/. For example the file name for 64-bit version would be similar to: msys2-x86_64-20161025.exe | ||
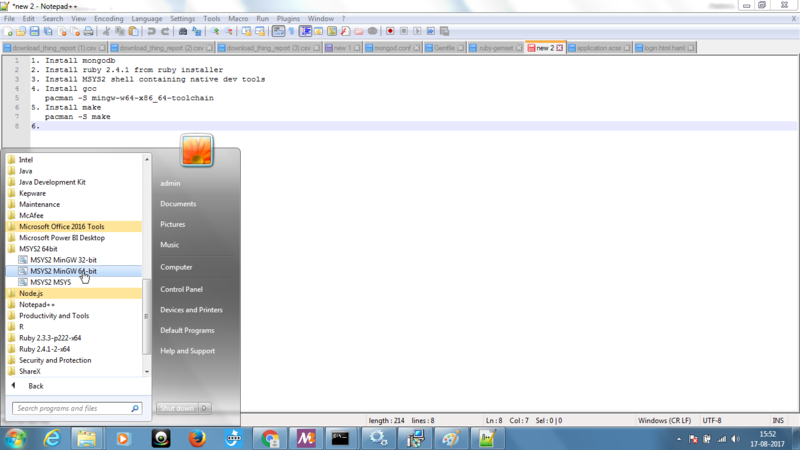
| + | * Run the msys2 shell (by navigating through the Start menu) | ||
| + | |||
| + | [[File:Navigate-msys2.png|800x800px]] | ||
| + | |||
| + | * Install development tools by issuing command '''pacman -S mingw-w64-x86_64-toolchain.''' Select all option | ||
| + | |||
| + | [[File:Install-compiler.png]] | ||
| + | |||
| + | * Similarly install make by issuing command '''pacman -S make''' | ||
| + | * Also, install vim '''pacman -S vim''' | ||
| + | * Open file ~/.bashrc using vim and add the following two lines at the end of the file: | ||
| + | ** export PATH=$PATH:/c/Ruby23-x64/bin:/c/Program\ Files/nodejs | ||
| + | ** alias vi=vim | ||
| + | |||
| + | [[File:Edit-bashrc-rails.png]] | ||
| + | |||
| + | * Close the shell by typing '''exit''' | ||
== Configure the application framework == | == Configure the application framework == | ||
| + | * Run the msys2 shell | ||
| + | * Navigate to the directory containing the app_framework | ||
| + | * Run command '''gem install bundler''' | ||
| + | * Next, run the command '''bundle install.''' Note that this will take a while to complete | ||
| + | |||
| + | [[File:Bundle-install2.png]] | ||
| + | * Close the shell by entering '''exit''' | ||
== Starting the development web server == | == Starting the development web server == | ||
| + | * Start windows command prompt | ||
| + | * Navigate to the directory containing the app_framework | ||
| + | * Run '''rake db:seed'''. This will create a default management user | ||
| + | * Run '''rake setup:load'''. This will create default pages within the app | ||
| + | * Next, you can start the server by entering command: '''rails s -p 3001''' | ||
| + | |||
| + | == Configuring the application == | ||
| + | * By default, the system generates an administrator with following credentials: | ||
| + | ** username: admin@appframework.com | ||
| + | ** password: admin123$ | ||
| + | * Open the [http://localhost:3001/admin_login admin page] in web browser and enter the above credentials. Make sure that the login works. Note that it will take a while to start for the first time. Basically a lot of javascript is getting compiled in the backend | ||
| + | * On the Admin dashboard, you can add two types of users | ||
| + | ** Accounts on Datonis - These should be account administrators on several accounts on Datonis. All users on such accounts will be able to login to the application | ||
| + | ** Admin for the local application - These are local application administrators. You can add more users for application administration. | ||
Latest revision as of 11:51, 17 August 2017
Follow the steps in the sequence described below:
Contents
[hide]Download and install Mongodb
- Note that you will need a 64 bit Windows machine for this setup.
- Download mongodb installer for Windows Server 2008 R2 64-bit and later, with SSL support x64 from: MongoDB Download Center
- Follow instructions from Mongodb documentation for:
- Downloading and installing the correct version for your platform
- Setting up paths for data and log storage
- Setting up Mongodb as a Windows service
Install Ruby
Download and install Ruby version 2.3.3 x64 from https://rubyinstaller.org/downloads/
Make sure you check the options to Add ruby to your system path during the installation. Refer screenshot below
Error creating thumbnail: Unable to save thumbnail to destination
Install nodejs
Download and install latest nodejs version for Windows x64 platform from https://nodejs.org/en/download/
Install and configure development tools
- Install MSYS2 for Windows x64 platform from: http://www.msys2.org/. For example the file name for 64-bit version would be similar to: msys2-x86_64-20161025.exe
- Run the msys2 shell (by navigating through the Start menu)

- Install development tools by issuing command pacman -S mingw-w64-x86_64-toolchain. Select all option
Error creating thumbnail: Unable to save thumbnail to destination
- Similarly install make by issuing command pacman -S make
- Also, install vim pacman -S vim
- Open file ~/.bashrc using vim and add the following two lines at the end of the file:
- export PATH=$PATH:/c/Ruby23-x64/bin:/c/Program\ Files/nodejs
- alias vi=vim
Error creating thumbnail: Unable to save thumbnail to destination
- Close the shell by typing exit
Configure the application framework
- Run the msys2 shell
- Navigate to the directory containing the app_framework
- Run command gem install bundler
- Next, run the command bundle install. Note that this will take a while to complete
Error creating thumbnail: Unable to save thumbnail to destination
- Close the shell by entering exit
Starting the development web server
- Start windows command prompt
- Navigate to the directory containing the app_framework
- Run rake db:seed. This will create a default management user
- Run rake setup:load. This will create default pages within the app
- Next, you can start the server by entering command: rails s -p 3001
Configuring the application
- By default, the system generates an administrator with following credentials:
- username: admin@appframework.com
- password: admin123$
- Open the admin page in web browser and enter the above credentials. Make sure that the login works. Note that it will take a while to start for the first time. Basically a lot of javascript is getting compiled in the backend
- On the Admin dashboard, you can add two types of users
- Accounts on Datonis - These should be account administrators on several accounts on Datonis. All users on such accounts will be able to login to the application
- Admin for the local application - These are local application administrators. You can add more users for application administration.