Difference between revisions of "Datonis:Edge Gateway OPC DA Adapter"
From Datonis
m |
m (Rajesh moved page Datonis:Edge Gateway OPC DA Configuration to Datonis:Edge Gateway OPC DA Adapter) |
||
| (2 intermediate revisions by the same user not shown) | |||
| Line 61: | Line 61: | ||
## click Edit Defaults… In the pop up window that opens, click Add… and select the user we added in step 1. | ## click Edit Defaults… In the pop up window that opens, click Add… and select the user we added in step 1. | ||
## Select both checkboxes Local Access and Remote Access under Allow | ## Select both checkboxes Local Access and Remote Access under Allow | ||
| − | [[File:dcom-1.png]][[File:dcom-2.png]] | + | [[File:dcom-1.png]] [[File:dcom-2.png]] |
# In the COM Security tab, under Launch and Activation Permissions | # In the COM Security tab, under Launch and Activation Permissions | ||
## click Edit Limits… In the pop up window that opens, click Add… and select the user we added in step 1. | ## click Edit Limits… In the pop up window that opens, click Add… and select the user we added in step 1. | ||
| Line 67: | Line 67: | ||
## click Edit Defaults… In the pop up window that opens, click Add… and select the user we added in step 1. | ## click Edit Defaults… In the pop up window that opens, click Add… and select the user we added in step 1. | ||
## Select all checkboxes under Allow | ## Select all checkboxes under Allow | ||
| + | [[File:dcom-3.png]] [[File:dcom-4.png]] | ||
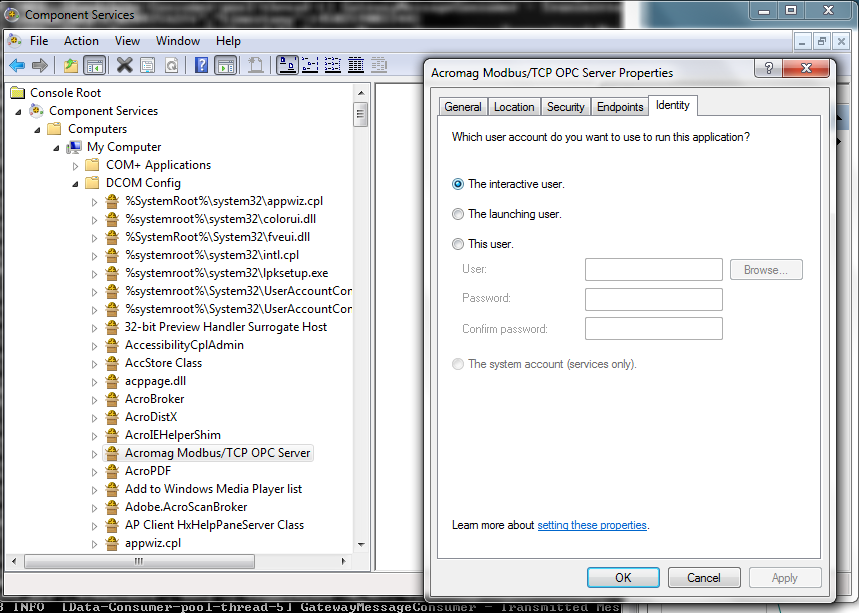
# Under Console Root -> Component Services -> Computers -> My Computer -> DCOM Config look for the entry corresponding to your OPC server. Right click and select Properties | # Under Console Root -> Component Services -> Computers -> My Computer -> DCOM Config look for the entry corresponding to your OPC server. Right click and select Properties | ||
# In the Identity tab, select the user to The Interactive user. | # In the Identity tab, select the user to The Interactive user. | ||
| + | [[File:dcom-5.png]] | ||
# Reboot the machine. Reboot is required for these changes to take effect | # Reboot the machine. Reboot is required for these changes to take effect | ||
Latest revision as of 06:47, 2 July 2017
Edge Gateway Home > OPC DA Adapter
Contents
OPC DA using DCOM Protocol
OpcDA Protocol Connection
| server_host | String | ip address or host name of the OpcDA server. |
| server_domain | String | In case the user is a domain user, specify the Windows domain with this attribute. |
| cls_id | String | DCOM class id for the OPC server. Details of how to get it are mentioned below |
| username | String | Specify the user we added in the DCOM configuration section above |
| password | String | Specify the corresponding password |
How to find the OPC server’s DCOM class id?
- In the start menu, type regedit.
- expand HKEY_CLASSES_ROOT and look for the name that matches your OPC server.
- Once found, expand it and you will find a key named CLSID
- Copy the corresponding value. This is your class id. Note that you need to ignore the curly braces around the ID.
OpcDA Protocol Tag
| tag_id | String | Unique tag id defined in the context of the current thing_config. This is used further in metric_mappings or derived_tags or monitor_tag_ids to refer to this tag value |
| node_id | String | The OpcDA tag definition which is present at OpcDA server e.g. ns=0;i=2259. The format for tag is as follows:
ns=<namespace id>;s=<string identifier of the tag> OR ns=<namespace id>;i=<integer identifier of the tag> For example: ns=2;s=Channel1.Machine1.Tag1 |
DCOM configuration on the OPC Server
The Datonis Gateway acts as a OPC client while fetching data from an OPC server. The default DCOM settings for a Windows host do not permit this communication. Thus it becomes necessary to make appropriate configuration changes so that this communication goes through.
- Create a local Windows user called “altizon” on the OPC server machine.
- Right click Computer and click Manage
- Under Computer Management -> Users and Groups -> Users, right click and select New User…
- Set an appropriate password
- Uncheck all options and then only check the Password never expires option
- Also, add it to the Administrators group
- In the start menu, in search/run, enter dcomcnfg
- Under Console Root -> Component Services -> Computers -> My Computer, right click and select properties
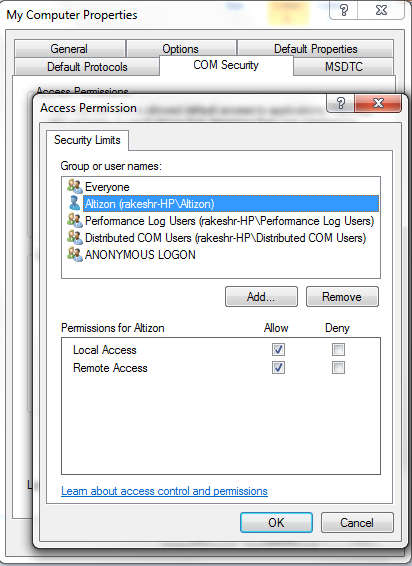
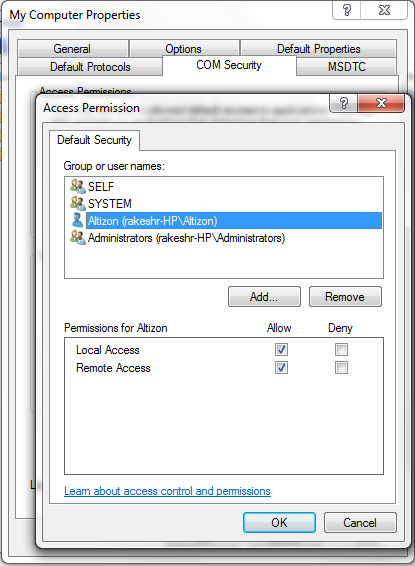
- In the COM Security tab, under Access Permissions
- click Edit Limits…, In the pop up window that opens, click Add… and select the user we added in step 1.
- Select both checkboxes Local Access and Remote Access under Allow
- click Edit Defaults… In the pop up window that opens, click Add… and select the user we added in step 1.
- Select both checkboxes Local Access and Remote Access under Allow
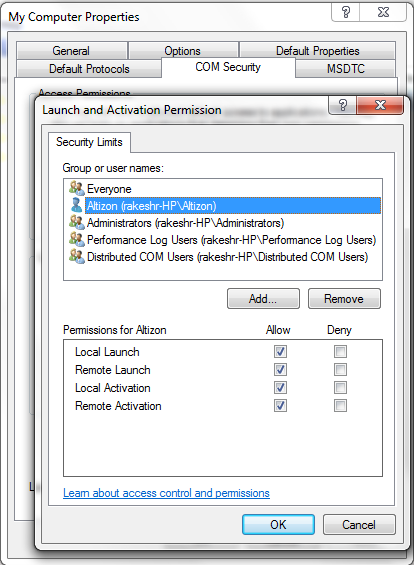
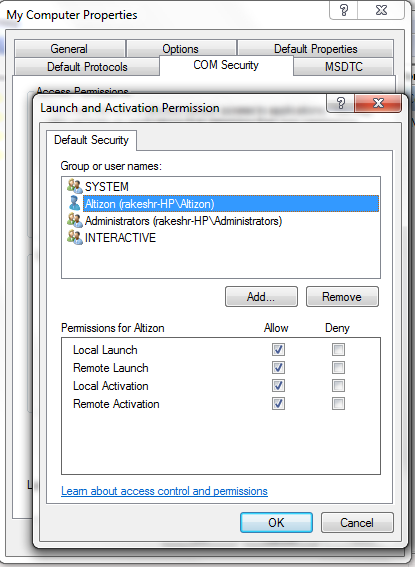
- In the COM Security tab, under Launch and Activation Permissions
- click Edit Limits… In the pop up window that opens, click Add… and select the user we added in step 1.
- Select all checkboxes under Allow
- click Edit Defaults… In the pop up window that opens, click Add… and select the user we added in step 1.
- Select all checkboxes under Allow
- Under Console Root -> Component Services -> Computers -> My Computer -> DCOM Config look for the entry corresponding to your OPC server. Right click and select Properties
- In the Identity tab, select the user to The Interactive user.
- Reboot the machine. Reboot is required for these changes to take effect
OPC DA using NGP Protocol
OpcDA-NGP Protocol Connection
| server_url | String | Address url of the OpcUA server e.g. da:[ngp://guest:guest12@demo.openscada.org:2101 ngp://guest:guest12@demo.openscada.org:2101] |
OpcDA-NGP Protocol Tag
| tag_id | String | Unique tag id defined in the context of the current thing_config. This is used further in metric_mappings or derived_tags or monitor_tag_ids to refer to this tag value. |
| node_id | String | The OpcDA tag definition which is present at OpcDA server e.g. ns=0;i=2259. The format for tag is as follows:
ns=<namespace id>;s=<string identifier of the tag> OR ns=<namespace id>;i=<integer identifier of the tag> For example: ns=2;s=Channel1.Machine1.Tag1 |
