Difference between revisions of "Custom Settings"
(Tag: Visual edit) |
(Tag: Visual edit) |
||
| Line 9: | Line 9: | ||
=== AWS IoT Latency Calculation === | === AWS IoT Latency Calculation === | ||
| − | Edge Sends a data package to the AWS | + | Edge Sends a data-package to the AWS, each data-package can have multiple things data. The number of things data in a data-package can be configured through bulk_size. A data-package contains timestamp when it is ready to send whereas thing data contains individual thing '''scan timestamp, thing key, and data array'''. |
Following will be the format for data : | Following will be the format for data : | ||
| Line 26: | Line 26: | ||
<code>"tag_1": 2542</code> | <code>"tag_1": 2542</code> | ||
| + | |||
| + | <code>},<code>{</code></code> | ||
| + | |||
| + | <code><code>"thing_key": "jt77eczb2d",</code></code> | ||
| + | |||
| + | <code><code>"timestamp": 1641561474357,</code></code> | ||
| + | |||
| + | <code><code>"data": {</code></code> | ||
| + | |||
| + | <code><code>"tag_1": 2542</code></code> | ||
<code>},</code> | <code>},</code> | ||
| Line 43: | Line 53: | ||
'''Calculation : total time taken from scanning to send = (Send timestamp - Scan timestamp) + (current received timestamp) - (Send timestamp)'''. | '''Calculation : total time taken from scanning to send = (Send timestamp - Scan timestamp) + (current received timestamp) - (Send timestamp)'''. | ||
| − | Scan Timestamp : timestamp under each thing object | + | Scan Timestamp : timestamp under each thing object. |
| + | |||
| + | Send Timestamp : timestamp to the end of package. | ||
| + | |||
| + | Current Received Timestamp : the AWS timestamp when data is received on the platform. | ||
| − | + | Total time taken from scan to send data-package is the time difference between data-package timestamp and scan timestamp of very first thing data inside data package | |
Revision as of 11:57, 3 March 2022
Edge AWS IoT Configuration
- Setup the AWS IoT Core account and download the certificate, AmazonCA1 and private key.
- Open Cloud Services and go to the AWS IoT Service Tab.
- Edit All the Necessary fields like aws-endpoint, private key etc.
- Select AWS from the edge.data-destination dropdown menu (This determines where to send data like to datonis or aws).
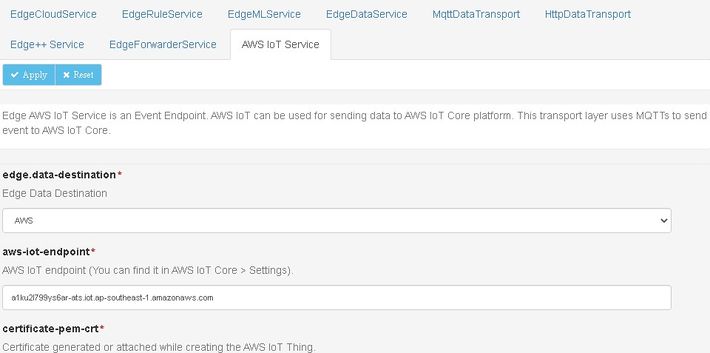
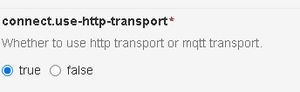
- Go to EdgeDataService Tab and change connect.use-http-transport to true to use the AWS IoT Service.
-
- Done.


AWS IoT Latency Calculation
Edge Sends a data-package to the AWS, each data-package can have multiple things data. The number of things data in a data-package can be configured through bulk_size. A data-package contains timestamp when it is ready to send whereas thing data contains individual thing scan timestamp, thing key, and data array.
Following will be the format for data :
{
"events": [
{
"thing_key": "ft26ecabad",
"timestamp": 1641561474351,
"data": {
"tag_1": 2542
},<code>{</code>
<code>"thing_key": "jt77eczb2d",</code>
<code>"timestamp": 1641561474357,</code>
<code>"data": {</code>
<code>"tag_1": 2542</code>
},
"data_faas_function": "",
"type": "data"
}
],
"timestamp": 1641795756303
}
Calculation : total time taken from scanning to send = (Send timestamp - Scan timestamp) + (current received timestamp) - (Send timestamp).
Scan Timestamp : timestamp under each thing object.
Send Timestamp : timestamp to the end of package.
Current Received Timestamp : the AWS timestamp when data is received on the platform.
Total time taken from scan to send data-package is the time difference between data-package timestamp and scan timestamp of very first thing data inside data package