Datonis:Using the Datonis Java SDK
Datonis Documentation Home > Build your connected Thing > Using Datonis Java SDK
Contents
[hide]Installing the SDK
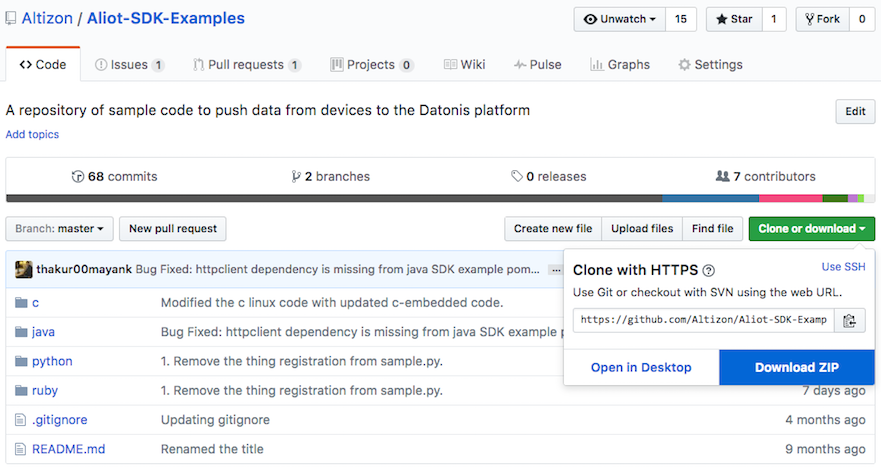
To get started with the Java SDK, you will first need to install the Apache Maven build tool. Please follow the installation instructions for your Operating System. All our code samples are available in our GitHub repository. If you are familiar with Git, you can pull the repository to begin. If not, you can download the entire repository of code samples as a zip file by clicking on the clone or download link.
Extract the zip file in a folder. You now need to go into the java folders and execute the following Maven commands to install the Java SDK and all its dependent libraries.
mvn install:install-file -Dfile=lib/aliot-sdk-4.0.0.jar -DgroupId=io.datonis.sdk -DartifactId=aliot-sdk -Dversion=4.0.0 -Dpackaging=jar
mvn clean install
We recommend using the Eclipse IDE to program the SDK. The following command generates the necessary project and dependency files required for Eclipse.
mvn eclipse:eclipse
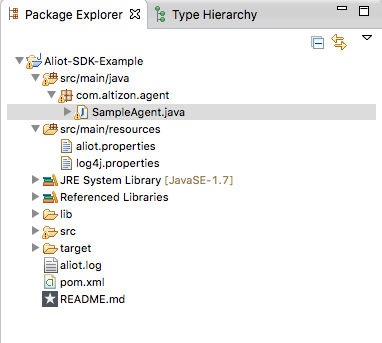
This command generates the necessary .project and .classpath files that Eclipse needs. You can now import this project into Eclipse by clicking on File → Import and selecting General → Existing Projects into Workspace. You will see a new project called Aliot SDK example added to your workspace.
Running the Agent for the first time
Modifying the agent configuration file
The SampleAgent.java file contains a reference implementation of a Java based Agent that pushes data to Datonis. To run this agent, you will need to edit the aliot.properties file. Your aliot.properties file should look like this. This file follows the JSON syntax. It is always a good idea to use a tool like JSONLint. If the JSON syntax of this file is not valid, the Agent will throw parse errors.
aliot.properties
{
    "access_key": "<Your access key here>",
    "secret_key": "<Your secret key here>",
    "bulk_transmit": false,
    "protocol": "mqtts"
}
- The access key and secret keys have been created by you earlier. Please refer to the documentation for this if you haven't. Copy the values for access_key and secret_key into the aliot.properties file. These keys are 40 character alphanumeric values. Please put the values in quotes. For example, "access_key": "ab12ab12ab12ab12ab12ab12ab12ab12"
- Additional configuration options in the file will be discussed in detail later. For now, you can keep the agent configuration file as specified above.
Setting the Thing keys in the agent
Now that your aliot configuration is done, you will need to configure the Thing for which the agent is transmitting data. You have already created a LivingRoom Thing in Datonis earlier. Look for the code snippet below and replace the "<Your Thing Key>" with the actual Thing key. This ensures that the Agent pushes data for your newly created Thing.
thing = new Thing("<Your Thing Key>", "LivingRoom", "The living room temperature and humidity device.");
Running the agent
You are now ready to run the agent for the first time. The agent needs to know where to find the aliot.properties and log4j.properties file. You will need to add JVM parameters for the same. In Eclipse, you will need to create a new Run Configuration for the SampleAgent. In the Arguments section, under VM Arguments, add the following settings
-Daliot.properties=src/main/resources/aliot.properties
-Dlog4j.properties=src/main/resources/log4j.properties
If you have used Log4J before, the log4j.properties file will be very familiar to you. The default setting is to log everything to the console and the aliot.log file. You can modify this based on your need.
Now run the agent. If everything has been set up properly, the agent will successfully connect and start transmitting data to Datonis. The you should see log messages indicating a successful agent transmit.
2017-04-06 12:25:55,448 INFO  [main] SampleAgent - Starting the Sample Aliot Agent
2017-04-06 12:25:55,457 INFO  [main] AliotGateway - Starting up the Aliot Gateway
2017-04-06 12:25:55,467 INFO  [main] AliotGateway - Agent will communicate using https
2017-04-06 12:25:55,907 INFO  [Handshake-Consumer] GatewayMessageConsumer - Handshake-Consumer is starting up
2017-04-06 12:25:55,907 INFO  [Alert-Consumer] GatewayMessageConsumer - Alert-Consumer is starting up
2017-04-06 12:25:55,907 INFO  [Data-Consumer] GatewayMessageConsumer - Data-Consumer is starting up
2017-04-06 12:25:55,908 INFO  [main] AliotGateway - Successfully started the Aliot Gateway
2017-04-06 12:25:55,908 INFO  [main] SampleAgent - Agent started Successfully, setting up bidirectional communication
2017-04-06 12:25:55,908 INFO  [Gateway-Monitor] GatewayMonitor - Gateway monitor starting up
2017-04-06 12:25:55,909 INFO  [Gateway-Monitor] GatewayMonitor - Sent heart beats for the Things
2017-04-06 12:25:55,909 INFO  [main] SampleAgent - Bidirectional communication is setup with Datonis
2017-04-06 12:25:55,910 INFO  [main] SampleAgent - Transmitting Demo Data
2017-04-06 12:25:57,975 INFO  [Handshake-Consumer-pool-thread-1] GatewayMessageConsumer - Transmitted Message in 2061 ms : {"timestamp":1491461755909,"thing_key":"your_thing_key"}
2017-04-06 12:25:57,975 INFO  [Data-Consumer-pool-thread-1] GatewayMessageConsumer - Transmitted Message in 2061 ms : {"timestamp":1491461755910,"data":{"humidity":66,"temperature":20},"thing_key":"your_thing_key"}
2017-04-06 12:26:06,774 INFO  [Data-Consumer-pool-thread-2] GatewayMessageConsumer - Transmitted Message in 859 ms : {"timestamp":1491461765914,"data":{"humidity":85,"temperature":4},"thing_key":"your_thing_key"}
Please ensure that you have a working internet connection so that the agent can transmit. If you are sitting behind a proxy, the section below will show you how to configure the proxy settings.
If there are any issues, the agent will print an appropriate error on the console. For instance, here's an error that's printed if the Thing key is invalid.
2017-04-06 11:53:57,755 ERROR [Data-Consumer-pool-thread-1] RESTCommunicator - Error 300025 : Invalid sensor key or thing key.
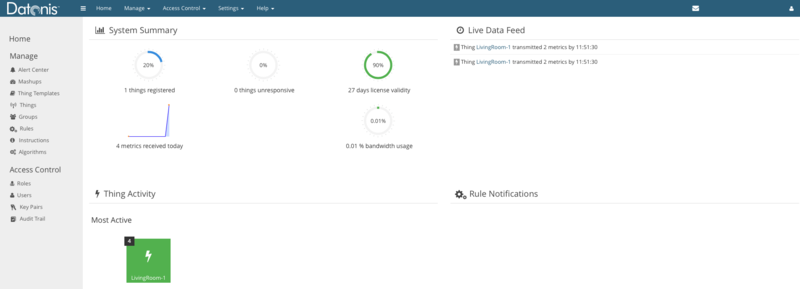
You can now verify that the Datonis platform has indeed recognised this Thing and is accepting data by clicking on Home and looking at the System Summary dashboard.
Here the Dashboard is indicating that your Thing LivingRoom has connected and is transmitting data. Please note that you are transmitting two metrics, temperature and humidity. Therefore the counts for the metrics in the Live Data Feed will reflect the actual counts of metrics received.
Additional Agent Configurations
You have already configured the aliot.configurations file. Here are some additional configuration settings that you can use.
| options | description | Data type | Default value | Mandatory |
|---|---|---|---|---|
| access_key | Access key associated with a key pair. | String | None | Yes |
| secret_key | Secret key associated with the key pair. | String | None | Yes |
| protocol | Sets the protocol used to transmit data. This should be set to MQTTS. MQTT is a highly efficient bi-directional protocol suitable for IoT. MQTTS is MQTT over SSL. MQTTS is also bi-directional. The agent will use the 8883 port to communicate so please ensure that it is open.
You can also use HTTPS if you cannot use MQTTS. Valid values are HTTP/HTTPS/MQTT/MQTTS |
String | HTTPS | Yes |
| bulk_transmit | If set to true, the agent will keep collecting metrics and transmits them in bulk at the interval specified by the bulk_transmit_interval parameter. Metrics are batched up in batch sizes specified by the bulk_max_elements parameter. This is extremely useful in low bandwidth scenarios and is also very efficient if you have a lot of metrics to transmit. The agent will transmit metrics immediately if this is set to false. | Boolean | true | Yes |
| bulk_transmit_interval | The interval at which the metrics should be transmitted. Unit is in milliseconds. For instance, setting this value to 60000 means that the agent will transmit the collected metrics every 60 seconds. | Integer | 120000 | No |
| bulk_max_elements | How many events to batch before finally sending the batch. For instance, setting the value to 25 means that the agent will send metrics in batches of 25. | Integer | 25 | No |
| proxy_host | If your internet connection is through a proxy, you will need to set the proxy details by providing values for the proxy host. | String | No | No |
| proxy_port | The proxy server port | Integer | No | No |
| proxy_username | The proxy server username | String | No | No |
| proxy_password | The proxy server password | String | No | No |
| request_timeout | Timeout while connecting/receiving response from the platform. Usually defaults work very well but you can increase the value if you have a slow connection and need a larger request timeout. The value is in milliseconds. | Integer | 10000 | No |
| thread_pool_size | The agent uses a pool of transmitting threads. This is useful to achieve parallelism when you are transmitting a lot of data. Usually the default works well for most scenarios but you can increase the value if you are transmitting a lot of data. | Integer | 5 | No |
| heartbeat_interval | The agent transmits heartbeats at a periodic interval to indicate that the agent is alive. This way the Datonis platform knows that the agent is connected and functioning properly. The default value is a heartbeat every 60 seconds. You can override it if you wish. The value in in milliseconds. | Integer | 60000 | No |
Agent Code Walkthrough
The SampleAgent code is well documented so going through that code should give you a fair idea of how to transmit data to Datonis. You should start by looking at the main function. It shows you how to initialise the agent, transmit a few data points and alerts, transmitting waypoints and handling control instructions from the Datonis platform
// First make sure you create an aliot.properties file using your access and secret keys.
// A sample file should be available with this package
// The keys are available in the Datonis platform portal
logger.info("Starting the Sample Aliot Agent");

// Create and Initialize the agent
SampleAgent agent = new SampleAgent();

// Start the Gateway
if (!agent.startGateway())
{
    logger.info("Could not start the agent. Exiting");
    return;
}
logger.info("Agent started Successfully, setting up bidirectional communication");

// Setup bidirectional communication - Needs to use MQTTS/MQTT mode for communication.
// Ensure that the 'protocol' property is set to 'mqtts' in the aliot.properties file
agent.setupBiDirectionalCommunication();

// Send a few sample simulated data events
logger.info("Transmitting Data");
agent.transmitData();

// Transmit a set of sample alerts.
logger.info("Transmitting Alerts");
agent.transmitAlerts();

// Transmit a waypoint
logger.info("Transmitting a waypoint");
agent.transmitWaypoint();
logger.info("Exiting");
agent.stopGateway();


